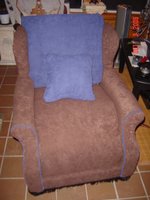
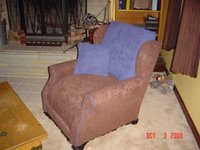
 Well, I got the chair done. It turned out really nice, but I am not sure if I am pleased with it or not. I may deconstruct part of it and change it. I am going to leave it as is for a week or so and see if I change my mind.
 Here is my handiwork with the foam. I use an electric carving knife (like what you use to cut a turkey) to cut and shape the foam. It makes it super easy, very precise, and fast to cut.
After fitting the foam pieces, they are each wrapped in quilt batting, then with cheese cloth. The arm pieces are then stapled in place. All of the other pieces are marked with an R or L for correct placement and then removed and set aside.
The fabric can then be cut to size, wrapped and sewn around the foam, or with the arms, stapled in place. Each piece goes back to the chair in a specific order, depending on how the foam was placed. With this chair, the order was, arms, wings, seat front, arm fronts, back of chair, seat, back cushion.
For crisp, straight edges, I cut pieces of poster board (thin cardboard) an inch wide and stapled the fabric to it, and then attached to the chair. These pieces were mainly used along the back side edges. I used some black trim on the bottom edge for fun. I also happened to have on hand, some of the black fabric that you see on the bottom of furniture, to hide the inside. So I used it underneath for a nice finished look. I also gave the feet a fresh coat of black paint.
 Here it is! It does look really nice. It is a much smaller chair than I envisioned it to be, but it is comfortable. The fabric stretched nicely, there are very few tell-tale puckers. Staples are all invisible too. I even made a nice pillow for it. I stuffed it with scraps of quilt batting and fabric. It now looks like a brand new chair. Remember what it looked like to begin with?
Wednesday, October 04, 2006
Ta-Da...the finished chair!
Posted by
Angie
at
6:00 AM
![]()
![]()
Subscribe to:
Post Comments (Atom)
No comments:
Post a Comment