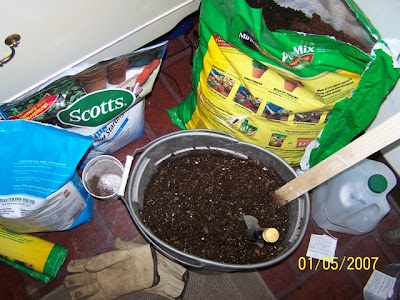
Friday, March 23, 2007

Winter sowing-it isn't too late to start some now

It's not too late, in fact, right now is a good time to start annual seeds.

Gather your containers, any shape or size will do, even those dark plastic coffee containers will do if you cut a circular opening out of the top and cover with plastic wrap.
Using an exacto knife of box cutter, cut all the way around the container, leaving a flap of plastic connected. Please be sure to cut away from yourself so there are no trips to the emergency room for stitches.

Then you will need to make drainage holes. You can either use the knife or use a soldering iron to melt some holes into the bottom. The soldering iron works super fast, although melting plastic does smell awful.

Gather up your seeds!

Get your soil moistened and ready to go. You want it moist like a sponge, no wetter, no drier. You will hear lots of "have to's" on the type of soil mixture to use. This year I mixed together potting soil, seed starter mix and a few hand fulls of perlite. Last year I just used plain old garden dirt (note that I said dirt instead of soil) and had no problems with sprouting or growing at all. BUT-I did have difficulty removing the plants from the containers because it was compacted and hard, even when moist. So don't be discouraged if you don't have the money to spend on bagged soil. Do with what you have, which is what I try to do.

Fill the bottom half of your containers with your soil mixture, sow your seeds (if using larger seeds, I place no more than 5 evenly spaced per 2 liter bottle. When using small seeds, I just scatter and will thin the plants later) and lightly cover with another layer of mix.
Tape your containers shut, I only use a small piece, just to keep the top closed to the bottom. I do not seal all the way around the container. This will allow air circulation.

Mark your containers with type of seeds. I use a china marker on the container and also on pieces of mini-blinds and put the piece of blind into the container. DO NOT USE A SHARPIE. Although it may be permanent on your skin or on your kids clothes, mother nature will wash it away very quickly off of your containers or mini-blinds!

Take your containers outside and put in a sunny location that is protected from the wind (to prevent them from being blown over). This batch is on the south east corner of the house. If you put them directly onto the ground, most likely you will have less watering to do, as they will absorb water from the ground. Bottom watering is better in the long run for most plants anyway. I have not had to do any watering at all yet and my first batch was put out December 28. Once it starts staying warm outside, I will remove the caps and keep them off to prevent over heating.

Here is all of my containers, around 60 total. Last year I used a lot of smaller water bottles. Although they worked out okay, those smaller containers are a lot of work, so I have gone to just using larger containers.

ANY kind of container will work. In fact, you can even use zip type baggies, just poke a couple of holes in the bottom, fill half way with soil, sow your seeds, cover with a bit more soil and seal closed except for a corner. Hold the corner open using a clothes pin or something that will allow air to release, since it won't be cut in half like a plastic container. I used some baggies last year and they work really well. Think of those large baggies that blankets and sheets sometimes come in.

Winter sowing is really nice. It allows a gardener to garden in the winter. So many of us are not lucky enough to have a greenhouse to play in and this is an affordable option. You can start right after Christmas, you can start before Christmas! So save those containers. This is a wonderful way to recycle all of those milk and juice jugs. Wash them out well before using, I run them through the dishwasher and it works great.

Thursday, March 22, 2007

My first Hellebore bloom

I received two of these in a trade last spring, so this is the first time I have gotten to see a bloom in person. It is a delicate looking flower, making it difficult to believe that it is one of the first of the season. It is also a short plant, I had to set the camera on the ground to get this picture. No matter, it is still nice to have growth and flowers again after what seemed like a very long winter.
I also have Crocus blooming. I am very surprised that the squirrels have not devoured them. I really love the color purple, such a spring time color that I love to see it the entire season.

The weather has been wonderful, in the 60's and 70's, allowing me to get out and get a lot of work done. My compost pile has grown to my height and hopefully will be cooking down real quick. I have put so much brush and weeds in it that I won't use it for a long time, maybe not until next spring.
I have winter sowing seedlings! This is Agastache rupestris, Sunset Hyssop. These seeds were given to me in a seed swap last fall. This flower is supposed to attract butterflies.And also Bachelor Buttons. These seeds were also given to me last summer and I wasn't sure if I really wanted to sow them, but decided why not? With nearly 4 acres, I certainly have room to plant them.

Thursday, March 15, 2007

The force of function behind design

With the wonderful break in the weather the past couple of days, I was finally able to work on drainage problem that we had on the southwest corner of our house. One of the previous owners had run the drain spout to run parallel to the house. At least they pointed it towards the back of the house, which is down the hill. Unfortunately, as the water gushed out of the spout, it was washing all of the dirt away from the garage foundation. Inside the garage, you could see the foundation washing away (another repair to be made in the near future).

When we first looked at this place, this is what this end looked like. Completely overgrown, weeds growing taller than the masses of day lilies and garden phlox which were running rampant.

Before we actually moved in, the owners (an investment firm, they didn't actually live here) were kind enough to clear the flower bed out and make it presentable.

There was no path from the front yard to the back, so one of my first projects was to gather bricks from the property (one of the previous owners, possibly the same bonehead to point the drain spout towards the foundation, used part of the property for a dumping grounds for his building removal business) and put in this path. I really liked the path and was pleased with the results. Unfortunately, it was not until later in the year when we realized the drainage issue. For a temporary fix, I replaced the bottom portion of the spout with one that faced away from the house, which caused the water to drain into the driveway and into the flower bed. My husband wanted to just run a tile away from the house, but my imagination was running wild. I knew that I had the materials to run the water through the flower bed and make it a feature, I just needed to plan it all out in my head.
This is the result.

I really, really love this design. A mixture of brick and rocks and stones. I used a swimming pool liner given to me last year to line the ditch. I removed 5 wheel barrels of dirt to create this. I still have to finish the end, where it actually drains into the lawn and redo the plants. This bed sun almost all day long, so I am planning on various grasses, sedums, hens & chicks, creeping thyme, candy lilies and I would really like to get an Agave. I still need to remove the overgrown garden phlox and remove the yellow day lilies, but that is for another day. I also want to add a lot more rocks. I really love rocks. Before I address the plants though, the hardscape is not yet complete. I have a couple of wooden trellises being stored in the barn that I am going to be putting in here also. They will separate the driveway from the flower bed, to be installed on both sides of the path. This will also give me a couple places to plant some more clematis, will create a wind break, a bit of privacy from the road, and maybe complete the design idea in my head.

Friday, March 09, 2007

Reprieve....

65 degrees today!!! 65!!! I cannot believe it. So wonderful!

I have been outside as much as I can. Washing windows, picking up sticks and branches and trash, getting mud all over my boots. Ahhh the joys of spring. I walked down by the creek and into the woods. Smelled a skunk, but luckily didn't run into it. I edged a flower bed until I got to a frozen spot and couldn't go any further. I checked out all of the bulbs coming up, Tulips and crocuses and daffodils and even hyacinths. I kicked the piles of snow apart to make the melt faster. I chopped some poison ivy out of a tree. I breathed deep and hard and I got HOT. What a wonderful day.

I got 7 more containers winter sowed today. Castor Bean, Black Russian Sunflower, Miribilis Jalapa, Cleome, Monarda, Impatiens, and Purple Majesty Millet. The plastic garden is getting bigger and I am almost out of bags of soil. I don't have any sprouts yet, but I expect it won't be long now that we are expecting temperatures above 50 for at least a week.

So many things to do outside now that it is warm enough to get out there. Many perennials to trim back. Plants to move. Soil to amend. Compost to turn. Maiden grass to cut down. Sink holes to fill. Lots of edging to be done. Bird houses to be hung. Rocks and bricks to collect. There are already weeds growing too.

Tuesday, March 06, 2007

Yippee!!! REAL spring growth!

Well, well, well...I can hardly believe it, but stuff is really and truly happening outside. The snow is finally melting (we are expecting another 2+ inches of the white stuff tonight, but 50's by the weekend!) and allowing me to take a peek at what is going on in my little world. The above picture shows a clump of Daffodils on their way to making a nice show and just below is a clump of crocus that surprisingly has not been munched down by the dang squirrels yet.


Next is a large clump of Grape Muscari that is on a path that I created last fall. I thought I had gotten all of this dug up and transplanted, but I guess not. That is okay, it is sort of off to the side of the path and probably won't get trampled too bad.

And last, but certainly not least, is one of my two clumps of Hellebores!! I know it looks like an itty-bitty head of lettuce, but it isn't. I am super excited about these coming up. I got them last spring in a plant exchange through Plant Traders and wondered if they would survive here. Looks good so far!


There are other things coming up too, literally. I have some crocus that have heaved up out of the ground, roots showing and all! Unfortunately, the ground is still frozen, so they still lay there. Hopefully this weekend I will be able to put a bit of dirt on them.

Thursday, March 01, 2007

Hints of Spring....


Well, it is March 1, 2007 and I have a geranium blooming and an impatien with flower buds on it.
You can see the impatien is frequently gnawed on by my cat, River, when I am not looking. That darned cat will try eating anything. I am surprised that he has yet to be sick.
Here is a view of my "indoor garden" this winter.
There are just as many plant that are scattered throughout the house. They keep me busy of course. I am really looking forward to being able to get them back outside and many of them into the ground. They sure do take up a lot of space inside.


I have been tossing around an idea to put an ad in the local paper to advertise my services as a "garden assistant". I wouldn't want to do any kind of designing or supply plants or anything, but rather help people get those flats of flowers planted, spread their mulch, pull some weeds and maybe help divide perennials. What do you think? Do you think people might go for it? I would even offer a discount to senior citizens. Just an idea.