Today I got my first batch of winter sowing done. I did 23 containers! I am excited to get started on some gardening (sort of).

Here is a list of what I started:
4 containers of Candy Lily
3 containers of Baptisia
2 containers of Stoke's Blue Aster
2 containers of Texas Star Hibiscus
2 containers of Prarie Night Monarda
1 container of Purple Spiderwort
1 container of Agastache Anise Hyssop
2 containers of Liatrus
2 containers of Tulip Poplar
2 containers of Sweet Bay Magnolia
2 containers of Frasier Fir
I would have done many more, but have temporarily run out of containers that are prepared. In another week or so I will be ready for a second batch.
The weather was mild today, in the mid 50's. I was able to get outside and also direct sow some seeds also. This list includes:
Purple Coneflower
Blue Flax
New England Aster
Red Yucca
Rocky Mountain Penstamon
Balloon Flower
Because the weather has been above freezing for awhile, I decided to also sow some spinach, lettuce and some Sweet Basil. It would be awesome to have a fresh salad in the middle of winter, or even late winter!
Another gardening project today was planting 14 Blue Delft Hyacinth bulbs. These are one of my favorites. A beautiful color, very fragrant, and deer resistant too. I planted these near my bedroom windows. This bed also has several young Red Bud trees planted in it. In a few years there is going to be spectacular color out those windows.
As gardeners always say, "Just wait til next year!"
Thursday, December 28, 2006
Winter Sowing has begun!!
Wednesday, December 20, 2006
Amaryllis bulb planting
Today I took my Amarylis bulb out of storage and got it planted. It has been sitting in the nice cold garage in a paper bag since October 15. That is right around the 8-10 weeks of required dormancy for it to rebloom. I have my fingers crossed.
I imagine most people would want their's to bloom at Christmas, but not me! I look forward to some nice bright blooms in January or February, when the outdoors is at its dreariest and there are few events happening.
It has 4 babies still attached. I debated on whether or not to remove them and pot them up separately, but ultimately decided not to. I do not expect them to bloom this year, but being still attached, they can get more nutrients from the mother bulb this way.

Here it is last year blooming and then this summer while in the ground. It is the strappy green leaves in front of the purple ribbon. The bulb grew a lot over the summer and if I did it correctly, there should be even more blooms this time.
I will keep you posted on its progress, with my fingers crossed!
Monday, December 04, 2006
How to make Garden Balls, a tutorial

Materials needed-a ball, flat marbles, GE Silicone II exterior version, grout or mortar mix with sand, water, plastic bag, rubber gloves, a paper plate or old lid, a spreader; such as a popcicle stick
Step one- Gather materials. I am using a tennis ball attached to a pole, which used to hold flags, until it broke (Reduce, reuse, recycle). Using the larger size of flat marbles, it will take approximately 40 to cover an entire tennis ball. I am using two shades of blue this time, and I figured out a pattern that I want to use.
Step two-Squirt some silicone onto the old lid. Make sure you use the right kind.
Step three- Using the popcicle stick, spread a liberal amount of silicone on a section of the ball.
Step four-Begin placing the flat marbles onto the ball in the silicone. Push firmly, but do not push so hard as to squish all of the silicone out from under the marbles. Step five-Add another section of silicone and another round of marbles.
Step six-Continue adding silicone and marbles all the way to the bottom of the ball. You may have to carefully hold the ball in the palm of your hand to place the marbles on the bottom half of the ball. Once completed, carefully set it down and let it dry over night.
Step seven-Put your mortar/sand mix into a bowl, about 2 cups full.
Step eight-Add some water and stir it up using another popcicle stick.
Mix should be very thick. If it is runny, sprinkle some mix in it and stir. Continue to add mix or water until a paste like consistency.
Step nine-With gloves on, scoop up some of the mix and start applying to the ball. You will want to push it down firmily inbetween the marbles. It is okay if it gets on the marbles.
Step ten-Once completed mortared, wrap in plastic and let sit for a couple of hours to semi-set. Do not worry at this time if there is mortar on the marbles. Step eleven-Unwrap ball from the plastic. Run it under slow moving water. If a hard running water is used, it could wash the mortar out from between the marbles. Using a rag, carefully wipe the ball, getting the excess mortar off of the marbles.
 Rewrap the ball in the plastic and let sit for another few hours. Once again, remove it from the plastic and gently wet and wipe. By now, you should have the mortar / grout cleaned off enough to make the ball look nice. Rewrap in plastic.
The garden ball is done now, except for curing. Curing will take a week or so. For the first 5 days, keep the ball wrapped in plastic, removing it once per day and gently wetting, either using the faucet or a spray bottle. This prevents it from drying too quickly and causing it to crack.
After five days, remove it from the plastic and continue to wet it down, several times a day. You will want to do this for at least 3 more days. Then you can let it start to dry more, with maybe only wetting it once a day or so. After another week it will be cured enough to place outside.
Thursday, November 30, 2006
The last day of Indian Summer
The weather has been wonderful this past week. Warm and balmy, like spring. So nice. I hate to see it end, but it will. Tomorrow brings the cold, the sleet, the snow.
I have been taking advantage of this nice weather and transplanted many things.
 I dug up a dozen Forsythia from a spot on the wooded hillside and planted many of them along the south edge of the property. We have a lane there that goes all the way to the bottom of the property. It is a nice lane, but I thought I would spruce it up with the Forsythia. They will also give some nice spring color and provide a bit more privacy for neighbors. It was a bit of a challenge to digging these up on the hillside. It is a bit steep and there is a lot of saplings to work around also. I fought falling down the hill more than a few times.
The new location will give them much more visibility and also much more sunlight. There are still a dozen or so left on the hillside. I am going to keep one or two of them there and move the rest of them to various parts of the property. I have another patch of Forsythia that also needs dug up and moved. It is right against the north side of the barn, right under a door. It is a tight grouping of many. They do not bloom well in this location, needing much more space and sunlight.
One of my favorite trees is the Eastern Red Bud. We are lucky to have a uncountable amount of them, of all sizes. They are mostly on the north end of the house, mostly lining the hillside and the state park property line.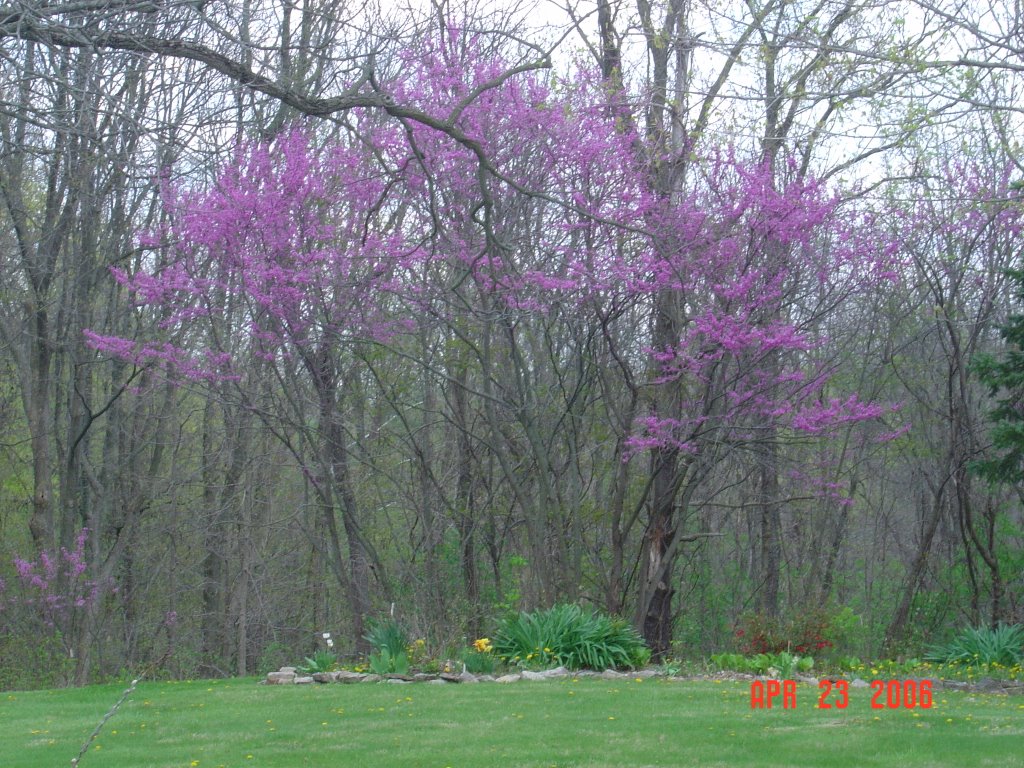 There are also hundreds more seedlings no taller than a foot everywhere. Red Buds do transplant well, but only if you move them when they are less than 3 foot tall. As a smaller tree when dug up, I usually bare root them (even in the middle of summer) and so far have had good success.
These taller ones are visible from the bedroom windows and also from the street. I absolutely love the color.
I transplanted one to the new Forsythia bed alongside the lane. It will contrast nicely with the yellow. I transplanted four more to the west side of the house in a newer bed that I have been working on for a few months. I also dug up a large clump of Liriope Muscari, divided it into four clumps and planted these in the same bed. The Liriope stays green through the winter, an added bonus to this plant with fall purple flowers.
I have a small Japanese Maple that I have been growing since it was a 6 inch twig that I purchased off of Ebay several years ago. This is a tough tree. I brought it from our old house, where it had been moved three times. I dug it up again this past week from its very sunny spot and moved it to a shadier location. The early afternoon sun was crisping the leaves in the summer, so it had to be moved. This also went into the newer west side bed with the Red Buds and Liriope. Two Blue Prince Hollys were also moved into this bed. I got these this past spring dirt cheap at the Flea Market ( one of my favorite places to go on Sunday mornings).
Other things in this bed include 2 Boxwood and various types of ferns, one being the Japanese Painted Fern.

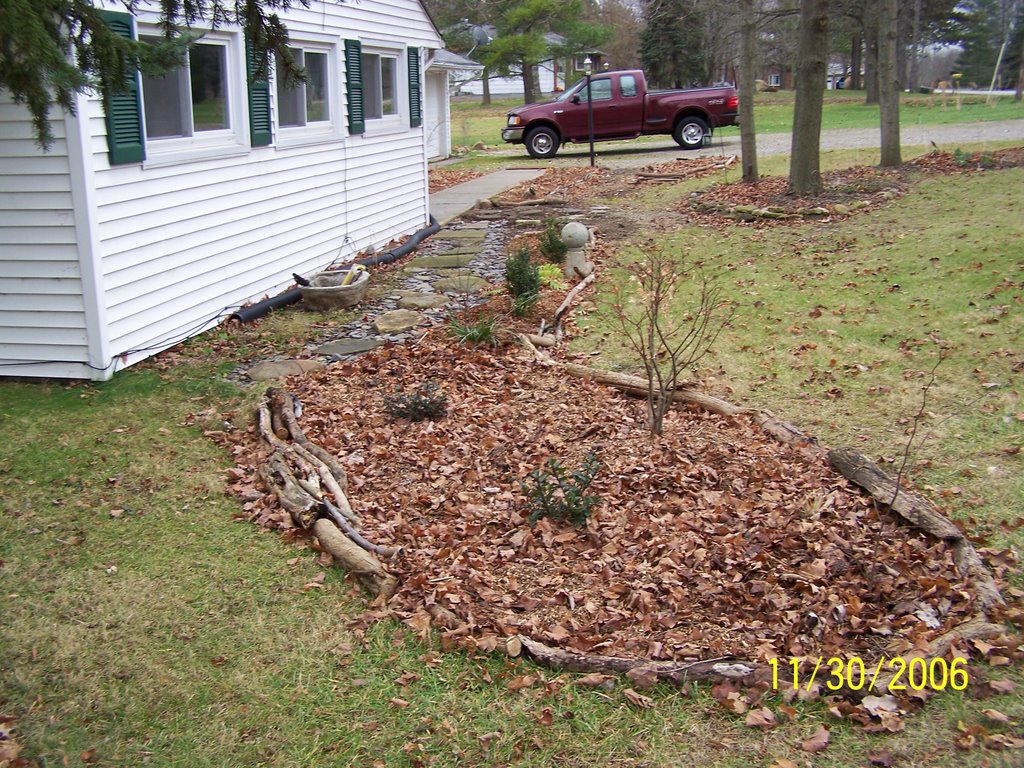 Here you can see this new long bed looking at it from both ends. I put the path in first, early in the summer. The black tube runs from our drainspout and needs to be buried. Another day, another project. The three windows are our bedroom. Once everything gets large enough, it is going to be wonderful to look out and see everything in bloom.
Friday, November 17, 2006
Making garden balls
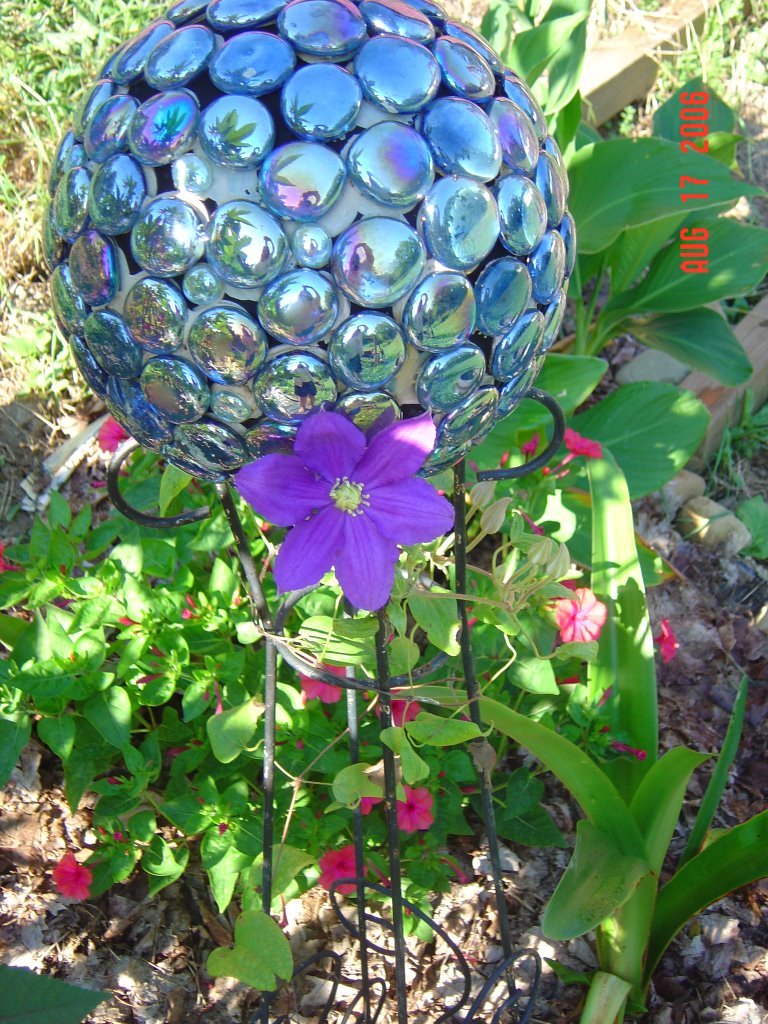
I really enjoy having art in the garden. It is fun to find a little surprise here and there amongst the flowers and foliage. If you have ever had a gazing ball, you know that they are very fragile and unless anchored well, a small breeze can knock it off the pedestal and break it to pieces.
Instead of replacing it with another fragile gazing ball, as lovely and enchanting as they may be, I did a sturdier version from an old bowling ball. You may have heard of this or even seen one. Flat marbles are attached to the bowling ball using adhesive. Sometimes grout is used after the adhesive has dried, and sometimes not. There is a variety of different marble colors and finishes. Some are shiny, some not. Some have a metallic finish and some are even multi-colored. They also come in several different sizes, such as the larger ones used in the first picture.
It does take some time and patience to create one of these. The ball must be cleaned and dried. You must have something to set the ball on while attaching the marbles. An empty coffee can works well to hold it steady while doing this. Then you must wait a day or two while the adhesive dries before turning it over and doing the other half. It is quite fun though, and I get a great feeling of accomplishment once it is completed.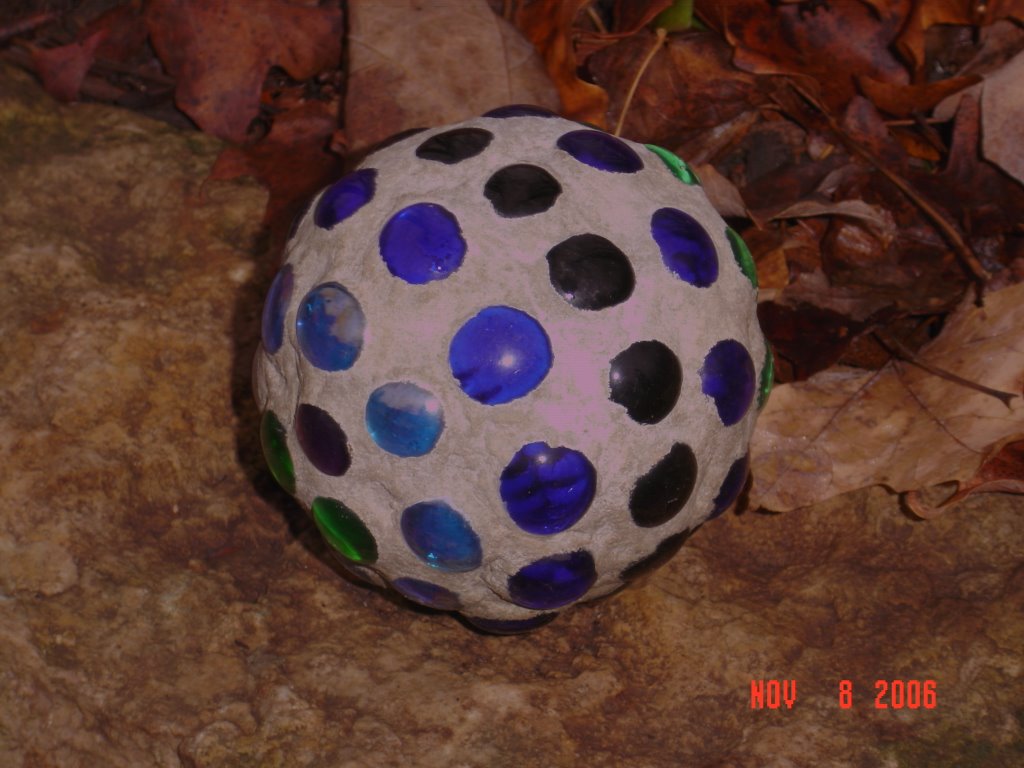
Smaller versions are also fun to make. This one was made using an old baseball. I have also made them using softballs, tennis balls, and even tiny wiffle balls. Smaller ones have their own challenges when putting them together. Instead of placing them on a stand while attaching the marbles, I just hold these and adhere all of the pieces in one sitting. Using exterior grade G.E. Silicone II (for doors and windows), I use a popsicle stick to smear the adhesive on a section of the ball and then stick the marbles to it, not pushing too hard to squish all of the adhesive out. It gets tricky holding the ball towards the end without pushing the marbles out of place. After they are all attached, I sit it aside for a day or so to dry.
There is probably premixed grout available to use, but I use an equal mix of portland cement and sand, with water added until is thicker than pancake batter. With rubber gloves on, I just grab some and rub it in between the marbles, squishing it in nice and tight. I then wrap them in plastic grocery bags for a few hours. By then, the grout has set enough that I can take a damp sponge and wipe the excess off the marbles. Spray it with some water and rewrap. A few hours later I will check them out, just to make sure that I didn't miss getting all the marbles wiped off, I spray it again and rewrap until the next day. I unwrap and spray them down (or just run under the faucet set on low) and wrap once per day for a week. Then unwrap and wet again and leave unwrapped. Spray them several times a day for a 2 or 3 days and they should be cured enough to just spray once a day or every other day for just a couple more days. The grout will end up drying a very pale gray, almost white. You can add concrete dye to the morter mix if you want different colors. I have also just added a box of purple Rit dye to the mix, and although the color wasn't consistent throughout, it did give the white gray some blue-ish areas, which was nice too.
When I used the wiffle balls, they had holes in them, so I was able to string some wire through them and hang them outdoors from a tree. I really enjoy making these. I like being able to make a pattern or use whichever colors I like. I haven't been able to find a local store that carries a wide variety of colors though. Walmart has a decent selection, but they always carry the same stock. I am now experimenting with using beads and glitter on a few instead of the marbles. I hope this will broaden my material selection. I have also seen pictures of balls that had pennies or nickels attached. They were certainly original and I am hoping to cover a bowling ball in pennies this winter.
Wednesday, November 08, 2006
Evolution...
 Here is the new pine bed I put together. It has a Blue Spruce (a true miracle tree) and an Arborvitae. When we first bought the place, this blue spruce was sitting on the ground, still wrapped in burlap. It was on the opposite side of the house, roots growing through the bottom of the burlap. It didn't get much sun, which I am sure helped keep it alive by not allowing it to dry out. I dug it up, removed the burlap and planted it in this sunny spot. It has grown 2 inches in the year it has been in the ground. The arborvitae we transplanted from our old home. I am hoping that someday it will grow wide enough that I can make a tunnel through it.
 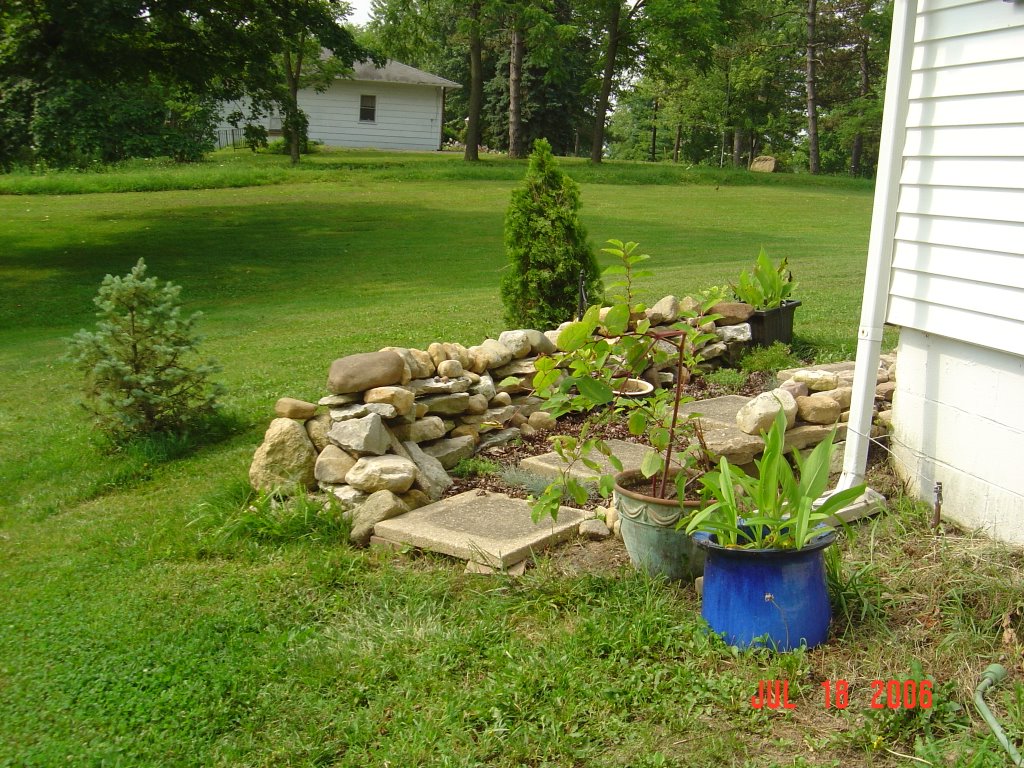 This view shows the path on the north side of the arborvitae. I think the tunnel will be really fun. Walking through tunnels or under arches is always intriguing. This one will be extra nice since it will be green year round.
The south end of the house has gone through quite a transformation in the year since we moved in. Originally, I believe it was a forgotten, or unthought of, space. The garage had a window and a shrub bed all along that end. There was an ugly overgrown trumpet flower shrub where the stone wall now sits. I couldn't wait to dig it out and get rid of it.
The shrub bed was weed filled and few perennials remained, choked out by mint and other obnoxious weeds. Day lilies, tall purple Phlox, and Yellow Loosestrife were the only ones strong enough to survive.  Here is the south end of the house in July of 2005 when we first came and checked the place out. The only few good things were the rocks lining the weed filled bed, the Spirea and Burning Bushes, and the nice pine tree. Before we moved in, the owners did mow down the weeds and dump some mulch over top. It did make it look a lot nicer, but unfortunately, it didn't smother the weeds.
 We removed the window and replaced it with a door. I moved the spirea out of the doorway and we made a small landing out of pavers found in the back yard. I then began yanking weeds, digging out that trumpet flower shrub (right corner of the above picture) and began rearranging the rocks. Then came the brick path at the left corner, right through the middle of the bed. The paver steps and short rock wall came next. Behind the house, a path leading from nowhere and leading to nowhere was made of the pavers. The path began at the back of the house, from which there was no door, no patio, no anything. It led across the yard and to the steep hillside, where treacherous, crumbling steps remained. I dug up all the pavers and we filled in the holes with dirt and grass seed. Those pavers have come in very handy for many projects!
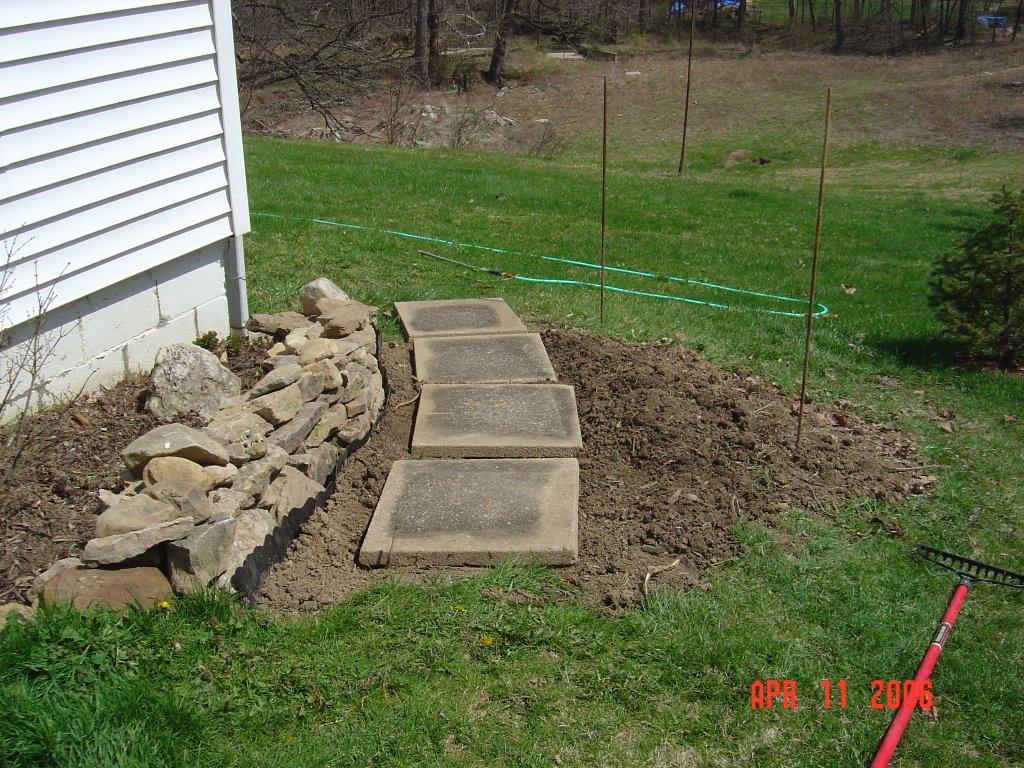 I carefully laid the pavers, making sure they were level and secure. The stone wall was the next phase of the project and then smaller stones and plants. It is filled with Creeping Phlox, Blue Fescue, Grape Muscari, and Chiondoxa.
The paths lead you around the side of the house and to the back yard, where wonderful views of the trees and the valley below greet you. It is one of my favorite parts of the yard now. It still has work to be done. The Yellow Loosestrife and the mint grow rampant. I am determined to get every last piece of them out and replace them with nicer plants. I hope to someday connect the brick path with the paver steps. This area is very much used and a path is being worn in the grass.
Quite interestingly, I found a baby Blue Spruce growing between two of the paver steps this summer. I carefully dug it up, planted it in a large pot and sunk the pot into the ground. Once it is large enough, I will pull the pot from the ground and plant the tree in the ground somewhere.
Little surprises like that are one of the things that keep me gardening. You just never know what will grow and thrive in your garden. It may be an unwanted weed, or it may be that tiny pine growing out of nothing. It always amazes me how such a large plant can grow from such a tiny seed. It is like magic.
Monday, November 06, 2006
The Joys of Lasagna Gardening...
Lasagna, doesn't it just sound wonderful and delicious? Layers upon layers of good things, each one different and great all by itself, but put them together and it is FANTASTIC!!!
Lasagna gardening is not unlike the italian meal. It is layers of earth friendly material stacked in layers, left to bake over the winter to be something wonderful in the spring. The ingredients vary by gardener (the cook) and usually starts with a nice grassy expanse (but needn't), covered in a nice thick wet layer of newspapers. The newspapers are a great way to recycle. They also smother the grass, making a nice weed barrier and help promote those nice red worms to the surface to do their magic.
On top of the newspapers, you put layers of compost, leaves (shredded or not), chipped wood, and any other organic materials you may have. Straw can be used, grass clippings, shredded newspapers can be added, if you have left over bags of top soil, they can be added. Top the entire thing with mulch and just let it sit until spring. Voila, you will have a nice fertile, organic, worm filled garden bed, waiting to be planted.
Follow this link for a good story on lasagna gardening; Lasagna Gardening
So a few days ago I began some lasagna beds in the wooded area in front of the house. I extended one existing bed by 10 feet, added another 8 ft x 4 ft bed and a path and began another triangular shaped bed around some smaller evergreens. I ran out of newspaper and had to go to the recycle center bins and retrieve some! So far I have two thick layers, the lower layer is all leaves and the upper layer is small chipped wood. I will be adding many more layers as the season progresses, but this is a good start.
These new beds are all outlined with sections of fallen trees. It looks rustic, a nice feature for the wooded area and a nice compliment to the stone lined beds. I brought a hollowed log from the ravine and placed it in one of the beds.
My husband Chris just shakes his head anymore at my gardening expansions. He is getting used to them and he always likes them come summer when the plants are flourishing.
You may be thinking it is going to cost a lot of money to fill all these new beds. It won't, thanks to the many seed swaps that I have been a part of. It won't be much longer and it will be time to begin winter sowing, the great way to gardening in the winter. This will provide many, many new plants for me and lots of pretty new flowers. I will also transplant some things from other places on the property, making the new beds look as old and established as the existing ones.
Saturday, November 04, 2006
Planning for spring has begun
Well, now that there is no green gardening to do, I have begun spring planning. Deciding which beds to expand, where to begin new ones, what to move where, what seeds to start for which locations! So much work, for such a long winter.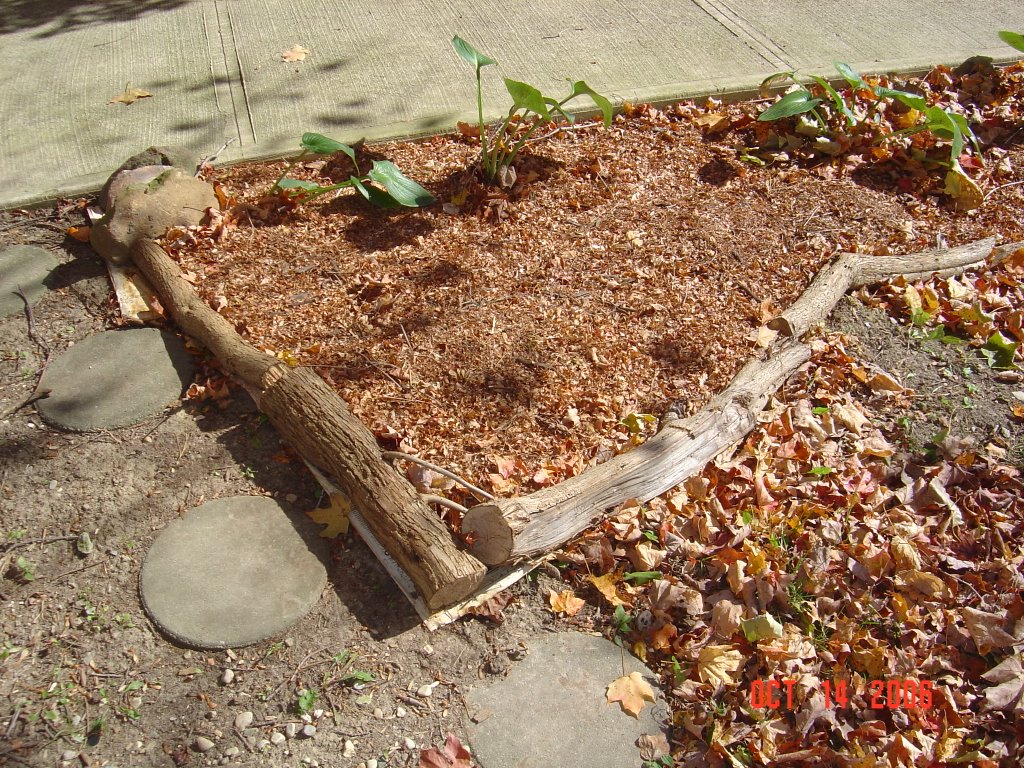
I spent a good amount of time lining two beds with logs and covering the ground around the plants with newspapers. Then raked tons of leaves, shredded them and put them thickly over the newspapers. The newspapers keep the weeds from growing and is organic. It will eventually break down and become part of the soil.
I also raked lots of fallen pine needles and then placed them over newspapers in another bed, along the south side of the house. It looks so much neater and cleaner with 'mulch' on it now. I hope to cover all of the beds with shredded hardwood in the spring.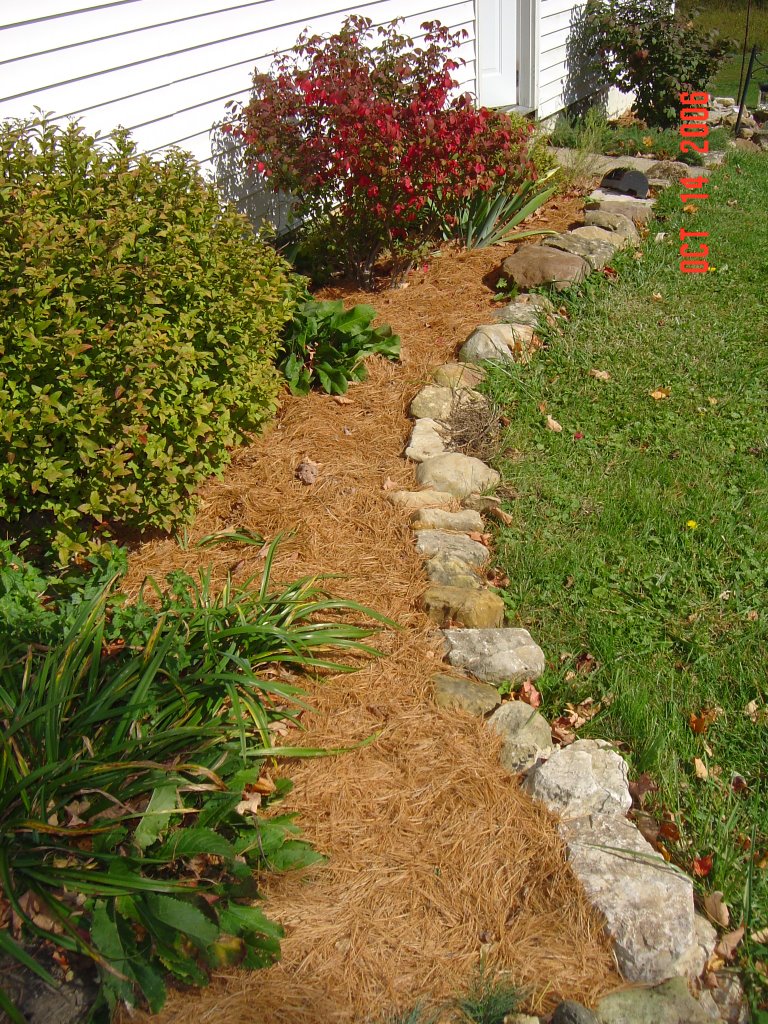 The county sent a letter recently letting us know that they were going to be trimming trees along the roads and asked if we wanted any of the shredded wood or logs. I said YES!! We get the shredded wood by the dump truck load and I requested 1-3 loads, plus the logs for the fireplace. I am very excited about this. I will be able to mulch all the beds, create paths, cover the existing paths, and hopefully still have enough to cover some of my outdoor work areas. This unexpected gift should be arriving in the next few weeks. By spring, it should be composted enough to spread right on the beds.
There is a lot of work to be done outdoors over the winter. This is the perfect time for rock and brick hunting/collecting. The previous owner dumped truck loads of rock and brick all over the property. It made some spots ugly, but it is nice for me to just go pick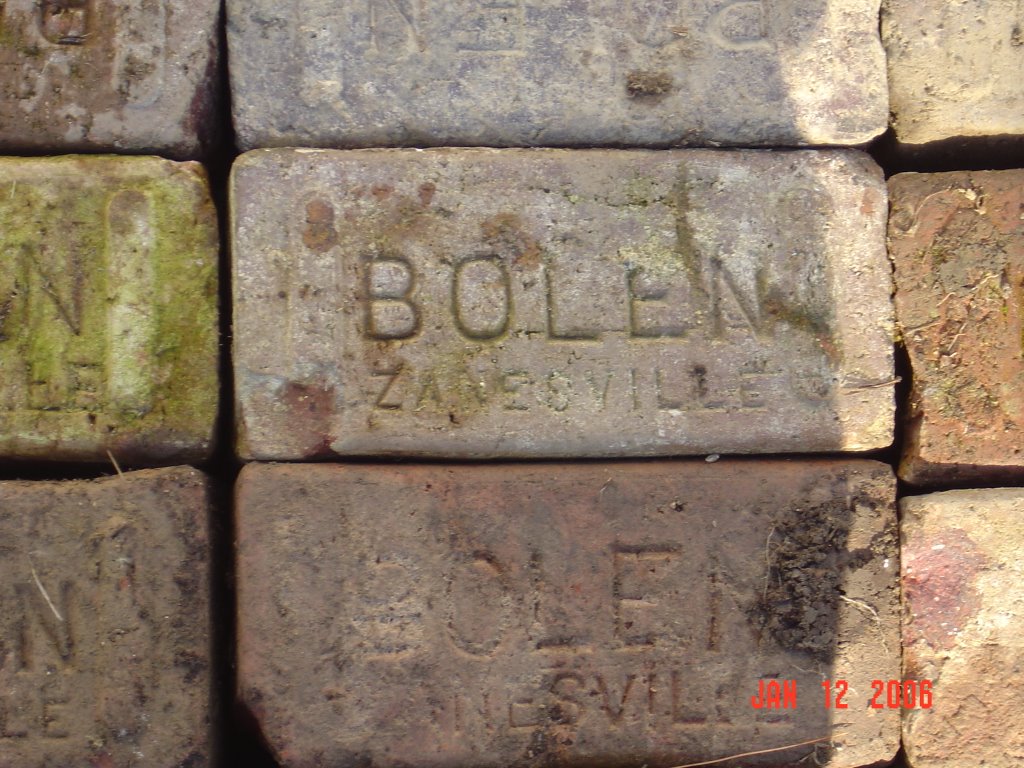 up what I need right here, instead of driving the back roads looking for farmer dump spots. The rocks are nice to line beds with, to stack as walls, or use as a focal point. The bricks also make nice edgers and make fine paths as well.
The rocks I have found are normal field stone, hunks of limestone, beautiful green, red, and white granite. As a lover of rocks, this is wonderful! I have rocks on every side of the house and even have a bunch inside also. There is nothing like a good rock to bring the outdoors in and to make me feel closer to the earth.
This is a short stone wall that I made late last winter, early spring. All the stone was found scattered about the property. I gathered and loaded the truck, loaded a wheel barrow, loaded a wagon, or just carried to this spot and carefully stacked it nice and tight. It turned out very nice and should last for many, many years. I hope someday that the arborvitae planted next to it will grow tall and wide enough so the steps will tunnel through it. Wouldn't that be fun and beautiful?
Saturday, October 21, 2006
Bare limbs everywhere
It has been a very busy time in the gardens. Digging Cannas, removing tomato plants, Castor Bean plants, Miribilis Jalapa plants and putting into the compost, taking cuttings. Everything is slowing down, cooling off and turning to mush. I still have some things flowering, Plumbago is still as blue as ever. I still have a few Balsam plants under the eaves that have escaped the frost too. I have been taking my DaVinci Poinsettia and putting it into the closet for 14 hours every night. Then, I bring it back out and put it in the window during the day, in hopes that come late December, those Peppermint bracts will magically appear. My Amarylis bulb grew quite a bit over the summer. I planted it in a flower bed so it would get maximum benefits. I think it worked. There are also several babies attached to it. I considered removing them to have more plants, but decided to let them stay with their mom for another year at least. I will just have to find a larger pot than last year when it becomes time to pot it back up. Here is a picture of it from last winter, quite a beauty. The variety is Hermitage. I bought the bulb on clearance last winter and it sure brought a lot of color when it bloomed. The flowers also lasted a long time, definitely a plus. I can't wait to how well it will bloom this time.
The leaves are almost gone now. With the rain and wind, they are falling faster. We can see the river again with the view unblocked. We can see if the water is high or if it is low and the spillway visible. The creek has been very full this last week with all of the rain. It has been almost dry, with only the deep pools still full of water. The fullness will finally allow those trapped fish a chance to get out get to the river now.
All of the tall wild flowers (weeds) are dead now and already starting to fall over, exposing the shape and contour of our property once again. The deer will be in plain site, easy to view. Here is a picture of our giant Black Walnut tree. It is the last the get leaves and the first to drop them. We have no idea how old the tree is, but estimate 80-200 years old. It is quite huge, 205 inch circumference, 106 feet tall, and the crown is 111 feet at its widest. It is in excellent health, with no dead branches and still producing nuts like crazy. I have entered it into the Ohio Big Tree competition, hoping it will be the largest Black Walnut in Ohio. They will come out and take official measurements sometime and compare it with current and other nominees. It is very shady below it during the summer. It also helps keep most weeds down too. We have seen many squirrels climbing its limbs and earlier this week had a Great Blue Heron sitting on a branch at dusk. That was a beautiful sight to see.
Friday, October 06, 2006
Autumn...just the intro to winter
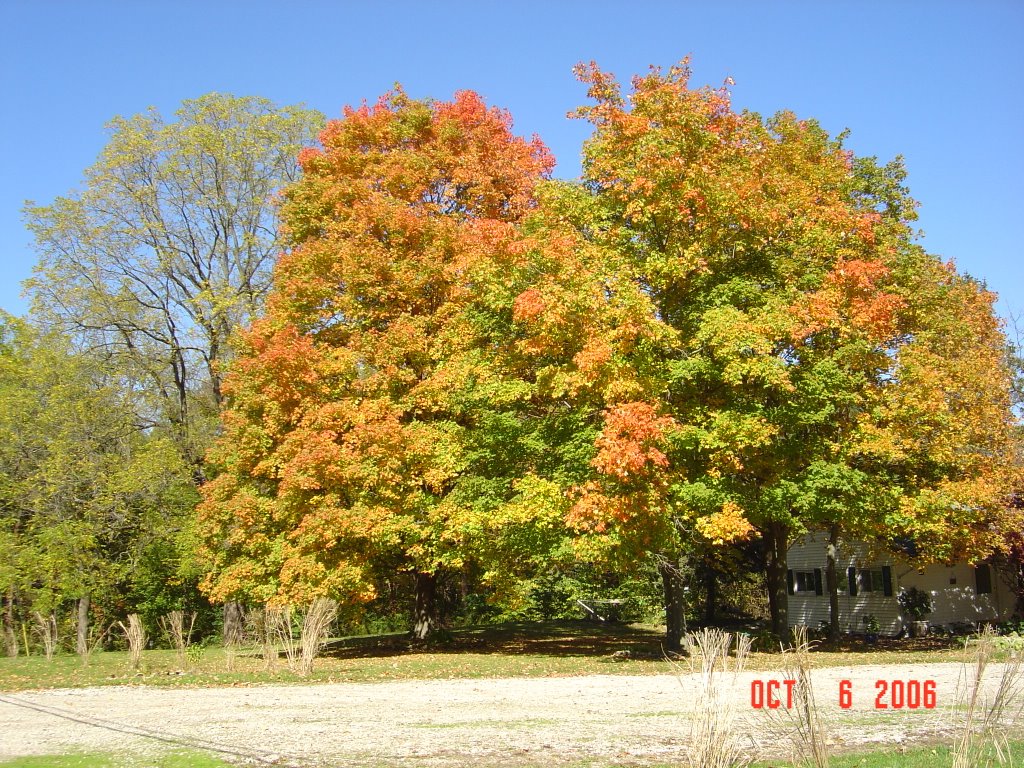 Yep, it's that time of year again. Boy, summer sure does seem to get shorter and shorter every year. The leaves change color quicker, the cool weather arrives faster, birds are gone, flowers are mostly done blooming, farmers are out taking the crops off. Combines go up and down the road all day long it seems.
I've trying to get out every day and get some winter prep work done. I have potted up Elephant Ears, a geranium, spider plants, impatiens, and various other things. I pulled up a lot of geraniums and put them into a paper bag to store away until next year. I've cut the Castor Bean plants down, they were already blown over from the wind. Also cut down the Perilla, pulled the 4 O'Clocks out and am ready to start digging up the Canna's next.
I have a list, and I have checked it twice, three times, for things to be done before frost. I've collected seeds and sorted those out. Some I will keep for winter sowing (another post on another day soon), some I will give away and some I have all set for a seed exchange.
Leaves are falling in swarms now. Some trees are bare already and some are close behind. Raking and blowing them into piles to make mulch will be coming real soon. Walnuts are dropping like crazy too. Here is a picture of what we've collected so far, and I bet there is already that many more below the trees again and we've probably pitched just as many into the woods. 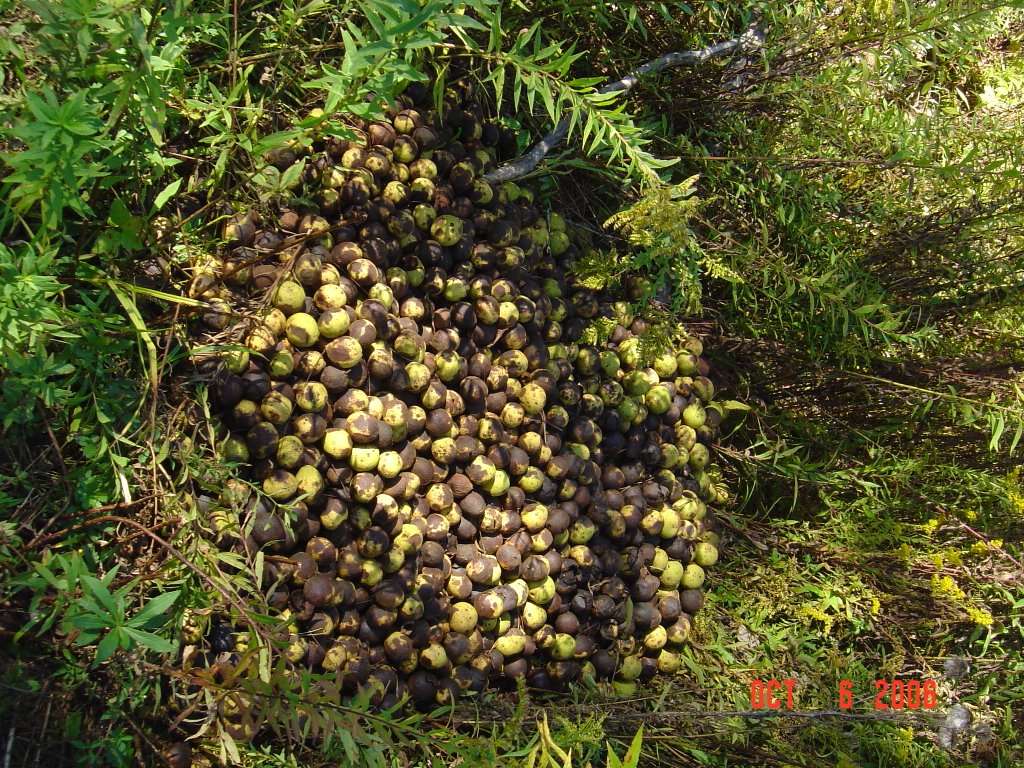 Speaking of trees, there is another thing to add to the list. We have loads of trees, some large and some small. There is a section behind the barn that has many smaller trees, 8 foot tall or less. There is Walnut, Maple, Elm, and Poplar. I need to go out and mark those as to what they are before the leaves fall off. We are going to transplant many of those to other locations on the property once they go dormant. Most of them are too close together and we really want to give the Walnut trees enough space to grow freely. Not that we don't have enough of them, but they won't last forever, so we are going to keep them planted at intervals so that maybe they could last for many generations to come.
Have you ever heard the old wives tale that the first frost occurs 90 days after you hear the first cicada begin its singing? I only heard that this year, in June, from one of the local news stations. We heard our first cicada July 4, which would make our first frost October 4th. Well, luckily, no frost yet, so that tale is ruined. Frost won't be far away though, you can feel the crisp coolness on the wind. It will be here soon, bringing SNOW shortly after.
Wednesday, October 04, 2006
Ta-Da...the finished chair!
 Well, I got the chair done. It turned out really nice, but I am not sure if I am pleased with it or not. I may deconstruct part of it and change it. I am going to leave it as is for a week or so and see if I change my mind.
 Here is my handiwork with the foam. I use an electric carving knife (like what you use to cut a turkey) to cut and shape the foam. It makes it super easy, very precise, and fast to cut.
After fitting the foam pieces, they are each wrapped in quilt batting, then with cheese cloth. The arm pieces are then stapled in place. All of the other pieces are marked with an R or L for correct placement and then removed and set aside.
The fabric can then be cut to size, wrapped and sewn around the foam, or with the arms, stapled in place. Each piece goes back to the chair in a specific order, depending on how the foam was placed. With this chair, the order was, arms, wings, seat front, arm fronts, back of chair, seat, back cushion.
For crisp, straight edges, I cut pieces of poster board (thin cardboard) an inch wide and stapled the fabric to it, and then attached to the chair. These pieces were mainly used along the back side edges. I used some black trim on the bottom edge for fun. I also happened to have on hand, some of the black fabric that you see on the bottom of furniture, to hide the inside. So I used it underneath for a nice finished look. I also gave the feet a fresh coat of black paint.
 Here it is! It does look really nice. It is a much smaller chair than I envisioned it to be, but it is comfortable. The fabric stretched nicely, there are very few tell-tale puckers. Staples are all invisible too. I even made a nice pillow for it. I stuffed it with scraps of quilt batting and fabric. It now looks like a brand new chair. Remember what it looked like to begin with?
Wednesday, September 27, 2006
Flowers and Hypertufa...
 I want to show off this Balsam, also known as Touch Me Nots. The seeds were given to me and I sowed them late, as in late July. They are now in full bloom and really pretty. It is like a touch of spring.
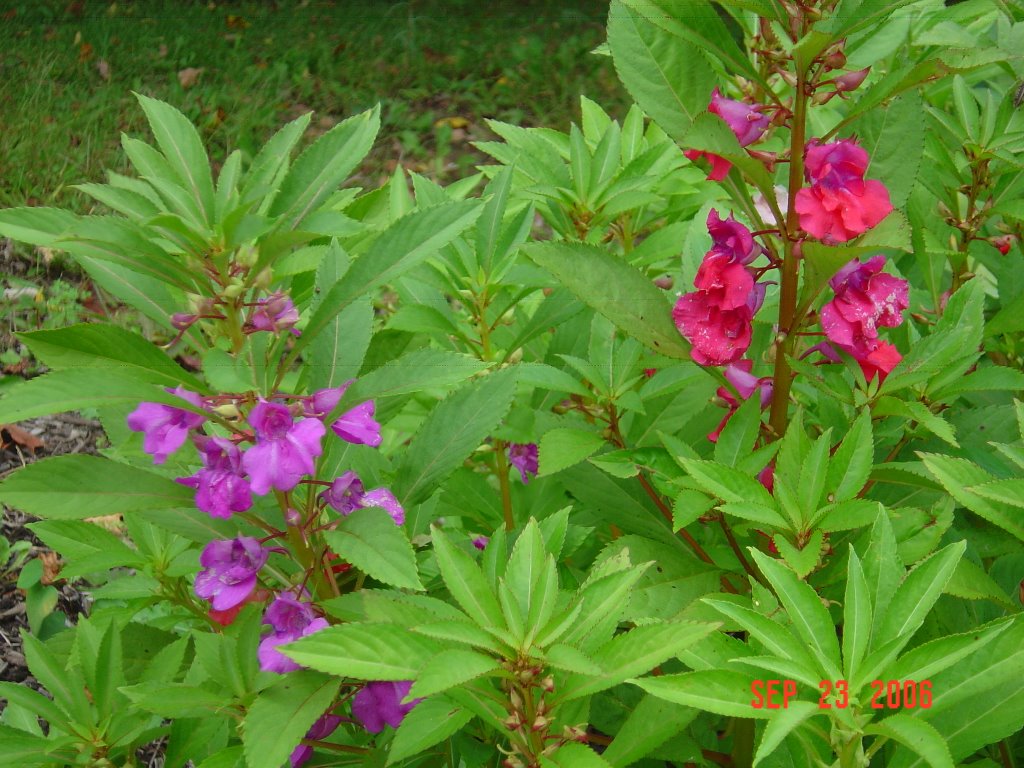
Here is a close up of the blooms. Aren't they colorful? I am hoping that I will be able to collect some seeds and grow these again next year. I really do like them.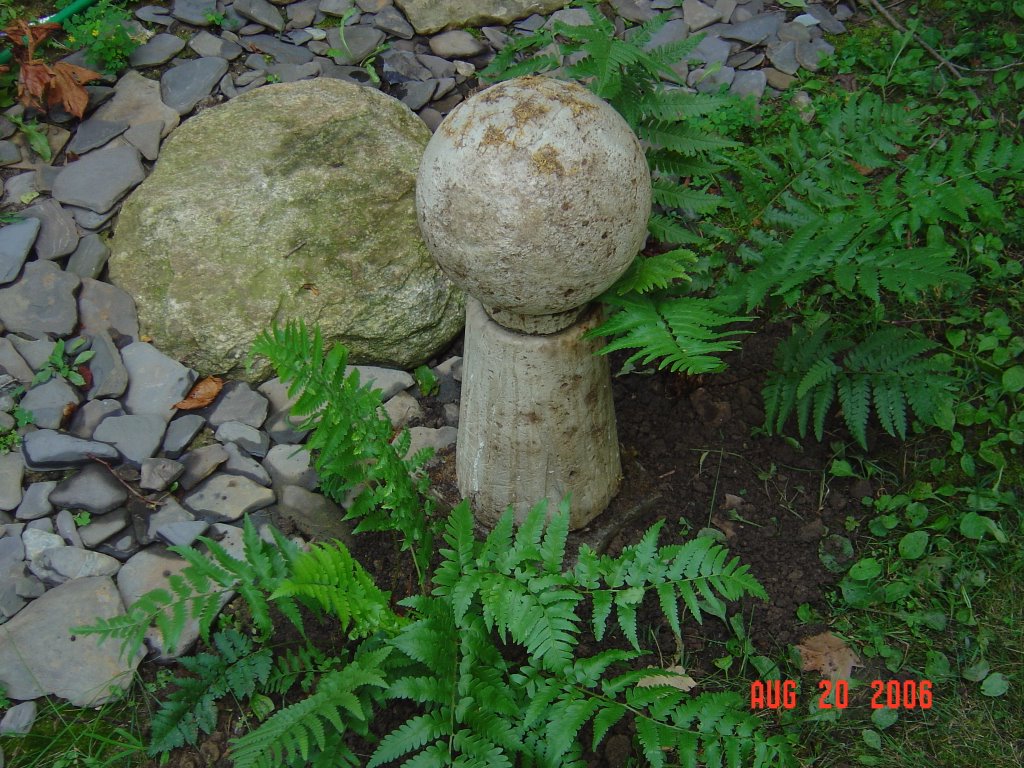 I made this sphere early in summer out of Hypertufa. I used a basketball, a sap bucket, and a cut down butter bowl as molds for each of the pieces. It was a lot of fun to make and I think it turned out fabulous! I hope to someday have moss growing on it.
Hypertufa is a mix of portland cement, sand, and peat moss. It is the modern, inexpensive version of the cut, light weight stone that old England used to make troughs. If you tried to buy some of those troughs now, they are very expensive. Hypertufa is a wonderful thing that can be molded into just about anything. You are only limited by your imagination. There is lots of info on the net about it. Here are a couple links that I have used to learn about it.
http://www.efildoog-nz.com/hypertufa.htm
http://www.hgtv.com/hgtv/gl_containers_outdoor/article/0,1785,HGTV_3561_4834334,00.html
http://www.gardengatemagazine.com/extras/53birdbath-video.php
I will talk more about Hypertufa and show some of my other creations in a later post.
I hope you enjoyed this today. I am off to work on my chair!
Monday, September 25, 2006
Fabric...
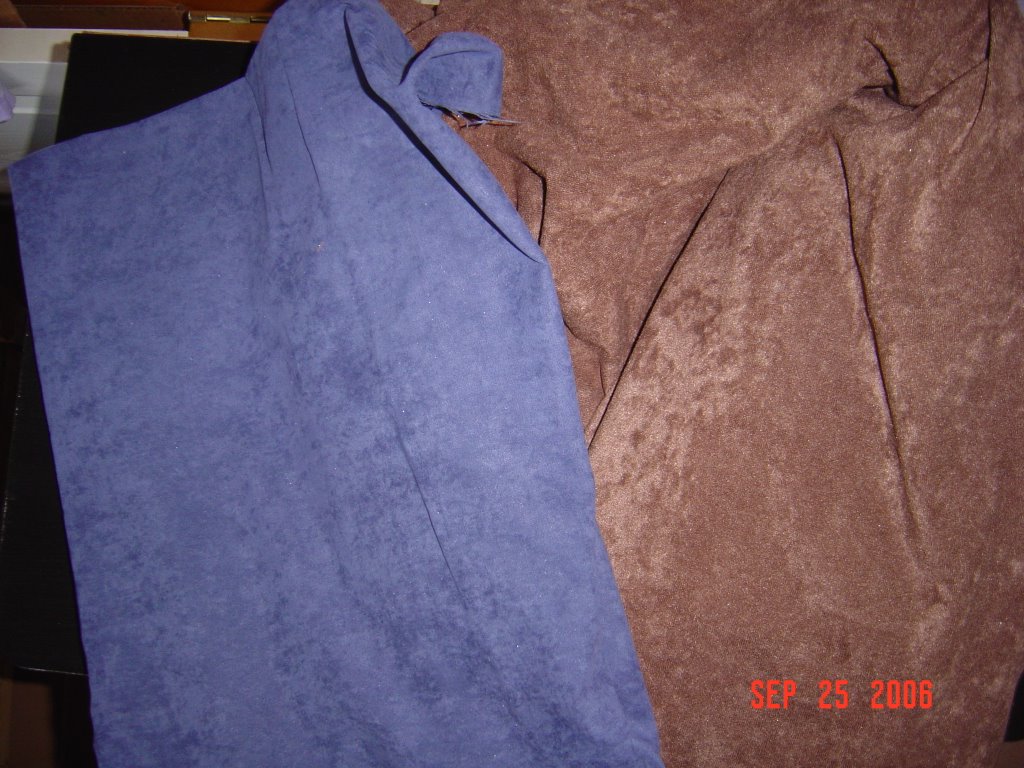
Well, here is the fabric that I picked to cover the chair in. I am not brave enough to try a pattern yet! I worry that I won't match it up correctly or will attach it crooked and be very obvious.
So I have picked safely, although I did have a great time looking at everything. I am going to do the seat in the blue and the rest in the chocolate brown. I am also thinking of doing the piping in the opposite colors, blue on brown and brown on blue.
These are both medium weight fabrics. I don't always pick an upholstery weight fabric, because I really don't want it to last forever. I can only stand looking at the same colors for so long and having two boys in the house...well, it wouldn't last forever anyway. I will probably be ready for something new in 5 years or so and it will need it.
Hopefully in the next couple of days I can get started on putting it together. I am excited! I have a lot of fun and get a lot of satisfaction redoing a chair.
Saturday, September 23, 2006
End of summer...
Well, unfortunately, it really is here. The end of summer. I have been taking cuttings of Perilla  and Impatiens
  and putting into water. The Perilla has quickly grown a mass of roots in the bottle I put it in. I dug up and potted my Poinsettia. It has really grown a lot this summer, but was beginning to suffer from the heat. We are having cooler temps right now and it really loves that. I potted up a variety of sedums and planted those into a hypertufa planter that I made. It too will be coming inside within a few weeks.
I still have many, many things to dig up and repot, an Amarylis, which I think has a couple of babies attached now, several Geraniums, an Orchid, and an African Violet. There may be more, but I can't think of them at the moment.
I still have day lilies to plant. I haven't any idea what variety they are. I found these sitting in a wheel barrow marked free along a back road nearby (I couldn't pass up free plants!). I have lots of stuff that I still want to dig up and relocate.
I also still have plants setting seed that I want to collect. Among them are 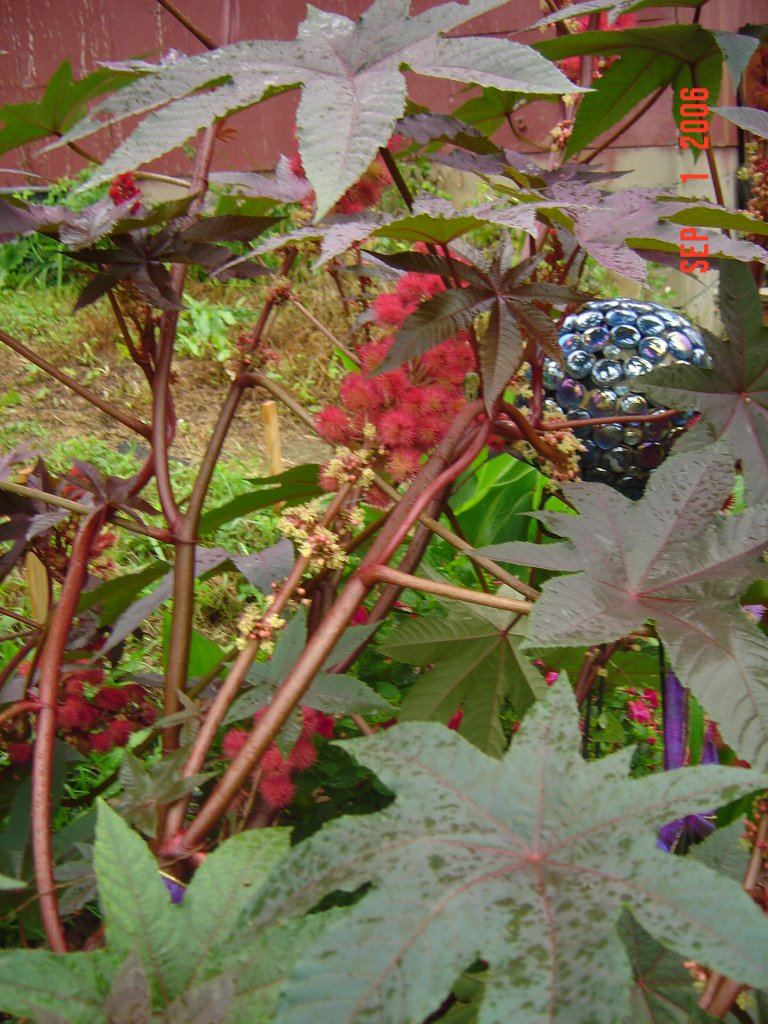 Amaranthus,
 Castor Bean, and
4:00's.
I have a half whiskey barrel that I want to plant some lettuce and spinach in real soon. We are having perfect temps for those to grow.
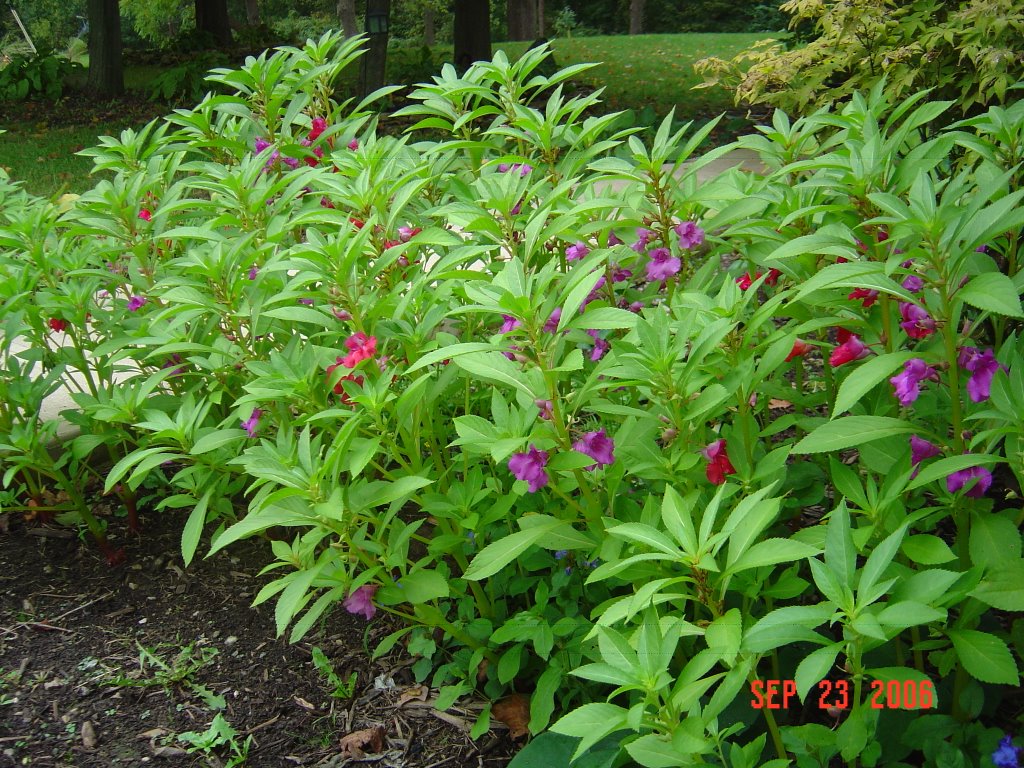
We are still enjoying a few things blooming. 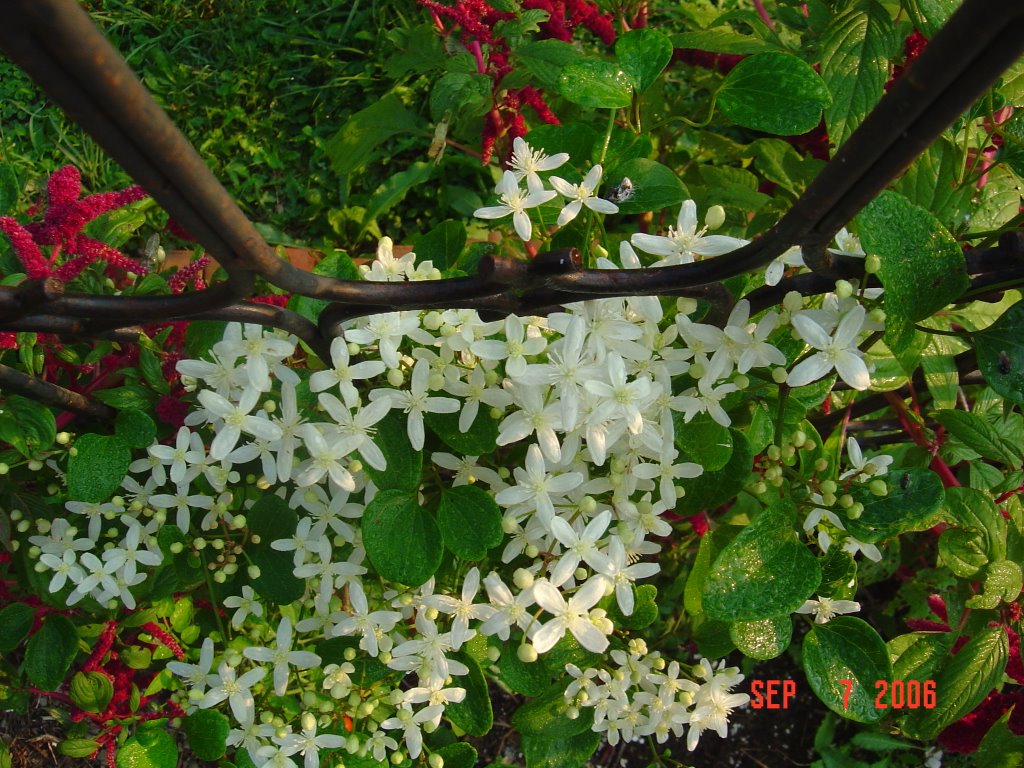 Sweet Autumn Clematis mingling with the Amaranthus. There is also one lone Jackmanii Clematis bloom mixed in with those also. Pink mix Cosmos is still going strong, as are the Moss Roses. Balsam plants are just beginning to put on a colorful show. I sowed these seeds late, the end of July, and it looks like spring in that area! I think I will sow more annual seeds later in the season next year. What a nice surprise to have that second flush of new flowers.
I have one Aster that is still blooming well. It is not in a prime viewing location though, so it will be moved also. There is also Plumbago (the perfect color), some Canna's, a few blue & salmon colored Flax, Muscari, Great Lobelia, and mini-Hosta's.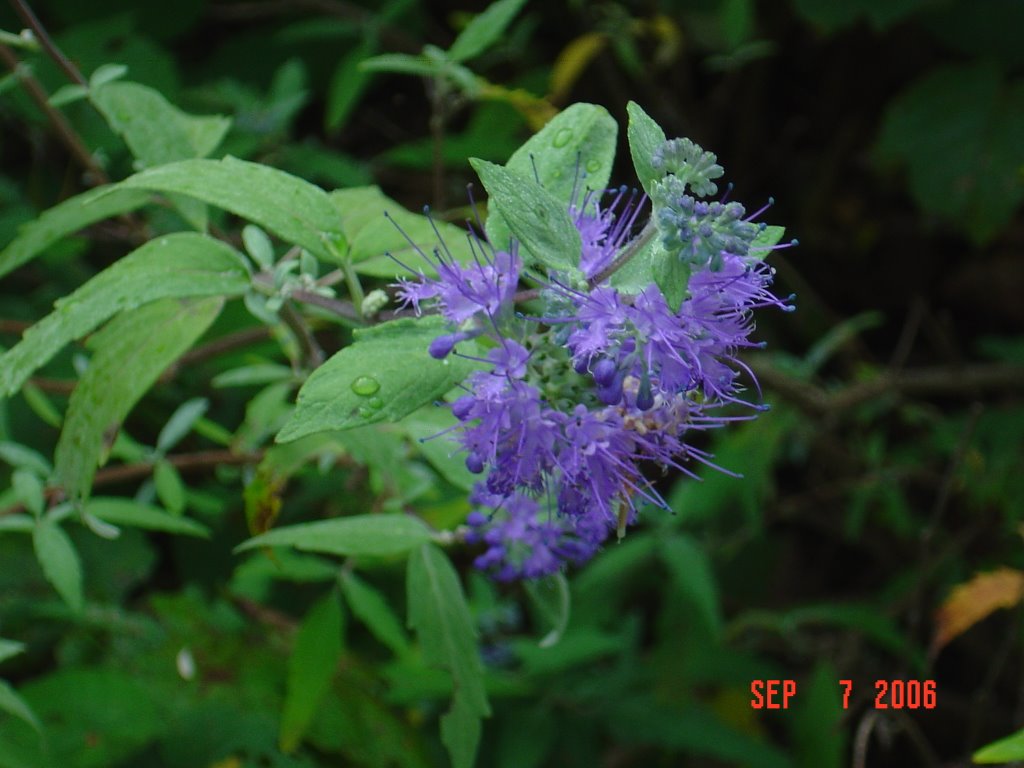 Purple Mist Shrub is still absolutely beautiful. What a wonderful surprise when I found this shrub crowded in the middle of some Red Buds. I moved it into a more open, sunnier location and I think (I hope) that next year it will be even better.
There is still a lot of outdoor work to be done before it gets too cold. Leaves will be dropping soon and in one area, they all fall at the same time. It is quite spectacular to see, all the leaves coming down in waves, so thick that you can't see past them. These will all need collected and hopefully shredded to put into the flower beds. There is wood that needs to be cut, so we can enjoy the fireplace (my favorite place in the winter!). Branches to be broken down into kindling.
I still want to gather flat rocks to continue some pathways and also some bricks to line some beds.
There is still a water trough that needs emptied and water plants to be stored.
So many things, but they are all items that will make next years gardening even bigger, better, and have more profuse flowers. At least, that is the idea, the hope, the reason for gardening...